Sivut

Showing posts with label Tutorial. Show all posts

8/09/2012

TUTORIAL: Tribal


It's time for a step by step tutorial! This time it's the "Tribal"- look I did few weeks ago. :)
Hope you enjoy!


* Inglot Eye Primer
* NYX Jumbo Pencil in "Milk"
* Meow Cosmetics "Tribal" (Lost Rainforest collection)
* Makeup Geek "Shimma Shimma"
* Makeup Geek "Corrupt"
* Makeup Geek "Last Dance"
* Makeup Geek "Vanilla Bean"
* Inglot Liquid Liner #25
 
 
Start by priming your eye with a regular primer. This prevents the NYX jumbo pencil from creasing:


Then apply the white sticky base (Nyx Jumbo pencil) to the center of your lid and also to the highest point of your brow arche if you wish:

Take the "TRIBAL" (Meow cosmetics) and and it with the flat stiff brush to your whole lid area:

Next I did my highlights with MUG "Vanilla Bean" (matte white) to the browbone and to the inner pocket of my eye. This step also prevents the darker shades to be so harsh:

Then pat your shimmery ivory color (MUG "Shimma Shimma") on top of the "Tribal". Stay only on the center of the lid:

With MUG's "Last Dance I darkened my crease like this:

With a matte black shadow (MUG "Corrupt") darken the outer part of your eye. Remember to blend well:

Then I did my liner:

Add mascara and your good to go:

OR if you have bigger eyes, you also can do your lower lashline. I have such a small eyes, I usually leave the lower lid empty:


I wish you all a happy day! :))


BTW!! My school starts next week! :) I already have my cosmetician outfit, but they sent me wrong colored shoes. xD
I got black shoes even if I ordered white. haha :D Oh well, I hope they sent the right shoes before I need them. I was little annoyed, 'cause everything else fitted me perfectly, but then the damn shoes were wrong. >_<
Also little bit my fault, if I don't get the shoes soon enough, I should have bought the stuff earlier (but I didn't knew!!!! <--- my poor explination) :P


5/30/2012

Bright Envy (Look of the Day) + Instructions


Hi everybody, here's the look of the day! :) (Was the time already, I haven't done anything for a while -.-')


Products;

* NYX Jumbo Pencil "Milk"
* Makeup Geek e/s "Yellow Brick Road" (Shimmery Yellow)* Makeup Geek e/s "Mandarine" (Shimmery orange)
* Makeup Geek e/s "Envy" (Forest green)
* Makeup Geek e/s "Corrupt" (Black)
* BH Cosmetics 120 palette (2nd edition) (Light green) 
* Sugarpill Cosmetics Pressed Eyeshadow "Tako"
* Black pencil liner
* Black Liquid liner (Inglot #25)

YOU NEED;

* 1 yellow
* 1 orange
* 2 shades of green: light one and dark one
* Highlight color of your choice (white or your skintone)

BRUSHES;

Sorry, they are dirty 'cause I used them O.O
* Small dome shaped brush or pencil brush
* Blending brush (dome)
* Flat stiff brush

***

Numbers indicate the places of each eyeshadow color, not the adding order.

1. Add your base (mine was white base)
2. Pat the yellow all over your lid with flat stiff brush


3. *Feather the orange partly to the inner part of your eye with the same flat stiff brush or with the small dome brush if the other brush is too big. (*feather = do small sideway strokes <--- in this case towards outer corner of your eye.)


4. Take the small dome brush and add some light green shadow to your outer-v are.
5. With the same brush blend the green you just added lightly towards your browbone.
6. Add the dark green shadow of your choice on top of the light 
green and blend with small strokes towards the orange. (Small dome brush or pencil brush)


7. Blend the harsh edges with a blending brush.
8. With pencil brush, line your lower lashline with the dark green.
9. With the lighter green, go on top of that dark green shadow you just added to your lower lashline. 
10. Add your highlight color to your browbone's highest part.
11. Line your lower waterline with black pencil liner or gel liner
(12. Line the upper lashline with black, winged liner + set it with black shadow)
13. Mascara

Bright Envy is DONE!!!! :)


Hope you liked it Lil' Readers! :)
See ya soon!


5/28/2012

Tutorial; "Out of Coffin"

Hiiiiii!

I was requested to do a tutorial out from this look;

"Out Of Coffin" Charlaine Harris Inspired
“Ever since vampires came out of the coffin (as they laughingly put it) four years ago, I’d hoped one would come to Bon Temps. – -
I knew immediately what he was. – - his skin had a little glow, and I just knew.”

Unfortunately I wasn't so sure about doing a step-by-step tutorial since I made this while ago. I wasn't sure what products I used etc.
But I do my best to give verbal instrucions. :)

~~~

PRODUCTS;

* MUG "Last Dance" (Plum-ish brown)
* MUG "Corrupt" (Black)
* Meow Cosmetics "Sand Dune" from Egyptian Treasures collection (Gold)
* Inglot liquid liner #25
* White pencil liner (Inglot)
* NYX Jumbo Pencil in "Milk" 
* Sugarpill Pressed Eyeshadow in "Tako" (White)

~~~

1. Prime your eye with regular eyeprimer (no white)
2. Take a small brush (eg. pencil brush.) ----> Add the "Last Dance" to the outer corner of your eye and drag it towards your brow.
3. Line the lower lashline with the "Last Dance" also.
4. Take your highlight color (white) and place it to the browbone's highest point.
5. Add a sticky white base to the part of your lid where you don't have any eyeshadow yet.
6. Pat the golden color over the white base you just added ---> blend towards the plum-ish brown color.
7. Soften the edges with fluffy blending brush.
8. Make a winged lin with black liquid liner.
9. Line your lower waterline with white (or leave without)
10. Apply mascara.

DONE! :)
('Love' it in HERE)

Although I didn't manage to take step-by-step picture, I did re-create this today....

"Out of Coffin"
No balck background or scary eyes :D


5/13/2012

Tutorial; Razzleberry Slushie


Now is time to do a SLUSHIE!

This look requires quite much blending - so be patient. :) In almost every step you need to keep adding those three shades of pink/red and play back and forth with them.

As I mentioned in the previous post, the zoomed pictures show the colors little weirdly, but I had to use them 'cause otherwise you couldn't see the places of the colors :)
(So forgive my bad photography day. Can I still defend myself by saying I'm still newbie with doing a tutorials? I mean this is just my 4th tutorial. :D.)

***

Let's start the SLUSHIE!

You will need;

1 Flat stiff brush
1 small stiff dome brush/ pencil brush
1 small brush for the lower lashline

Eyes;

* MUG "Razzleberry" (Red)
* MUG "Corrupt" (didn't use this in the original one) (Matte Black)
* Sugarpill "Tako" (Pure matte white)
* Sugarpill "Tiara" (silver)
* BH Cosmetics 120 palette (2nd edition) (light and medium pink)

(If you don't have these particular products, that's fine. Just use what you have. :))

***


PRIME. + Add a white base if you want (helps the colors show brightly)

Add your white color to the browbone. (Tako by Sugarpill) With this look the highlight color can be seen really well so don't worry if it seems too white.

Place your lightest pink to the crease like this with FLAT stiff brush. (notice how my color is drawn little bit up to the browbone area)

Take your medium pink (almost neon pink) and place it right under the light pink you just added.

Take your RED ("Razzleberry" by Makeup Geek) and place it into the crease also. AT LEAST in this point you have to start going back and forth with those three shades of red. (Meaning that you may want to add some more of that medium pink, maybe that light pink and then again the red... )

Carefully dap a sticky white base to the middle and inner lid.

TAP some silvery glitter/loose shadow ("Tiara" by Sugarpill) over the sticky base. We want that icy, frosty, Slushie feel ;)

We don't want that 'ice part' to be too white so really softly tap some of that medium pink/neon pink on top of that silver. (If you loose that silver too much, then add more and then again that pink. also keep adding that red into the crease, since you will loose some of it!)

Line the lower lahsline with the medium pink and then the outer half with the red ("Razzleberry")

Switch to your small STIFF DOME brush/Pencil brush and add some black to the outer V ("Corrupt" by Makeup Geek) ---> Blend inwards with a red on your brush.
Keep adding the pink and the red until the intensity is what you desire!!!

At this point I messed up the shape of my eyeshadow :DDDD (LOL!)
BUT;

Liners;
Black liquid liner to the upper lashline
Black pencil liner to the upper waterline
White pencil liner to the lower waterline
+
Add Mascara (after all of the shadows are ready). Clue some rhinestones and add MEGA shiny falsies! :D
Bad lightning in this photo, the reds for me at least seem too dull and dark...

And your Razzleberry Slushie is all done! :)


Number '3' is the one you would wanna see the most (look the picture above), so keep adding that thorough the whole process (I can't write 'process' :'D Did I write it right?)
Seriously what on earth happend to the red in this picture!!?!?!? :'DDDD So annoyed. Oh well, maybe I can live with that. :D

***

Maybe next time I take the step-by-step pictures right away so I don't have to do the look twice :D (and then the looks aren't also different from each other.)

***

Hopefully this was helpful and fun! :)
If you need more information, you can always contact me by e-mail or by comment! :))

If you liked RAZZLEBERRY SLUSHIE, Vote it in HERE <3 :)

5/01/2012

Tutorial; Sun Cocktail

Here's now the other tutorial I promised to do! :)

SUN COCKTAIL

NOTE!
The one I did for the tutorial, came up to be little bit lighter than the original one! (but just use more orange, haha :D)
Sorry if my skin is freakishly pale, I used flashlight.

PRODUCTS;
* MUG "Chickadee"
* MUG "Corrupt"
* MUG "Goddes"
* Sugarpill "Tako"
* Sugarpill Loose Shadow "Goldilux" (BOHOOO, I'm almost out of my Goldilux, 'cause I only had a sample size!! ;( )
* MUFE e/s #02
* Ardell False Lashes "Babies"

Start the Sun Cocktail look with primer;

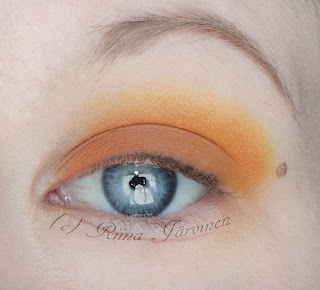
 Add "Chickadee" (or anu burnt orange) all over the lid;

Blend some yellow into the crease;

Very lightly add more "Chickadee" on top of the yellow you just added;

 (OPTIONAL). Darken the orange with a copper color ("Goddes" from Makeup Geek);

The fun and SPARKLY part! Pat Sugarpill's Goldilux to the center and inner parts, but leave outer corner without (remember use some glitter insurance);

 Blend black color ("Corrupt") to the outer corner with the orange shadow on your brush;

 Add your highlight color to the browbone and blend harsh lines + add "Goldilux" to the lower lashline;
As you can see, I lost some of that yellow and orange. You just need to keep adding those colors to get the right intensity.
 Then wipe some mascara and line your lower waterline with white. (I also made the orange stronger at this stage);

Then just the false lashes;
Original picture

YOUR SUN COCKTAIL IS ALL DONE! :)
Let me tell you, this is SUPER ÜBER sparkly under the sun because of the Sugarpill's Goldilux! (I think I have to buy the full size jar!) <3


Hope you liked it Lil' Readers!